-
.NET (.NET Core)
-
1C
-
APL
-
AWK
-
Agda
-
Agile/Scrum
-
Alef
-
Assembler
-
Basic
-
Beta Programming Language
-
Big Data/DataScience
-
C
-
C#
-
C++
-
CSS
-
Cobol
-
Crystal
-
D
-
Dart
-
DataBase (SQL)
-
Delphi
-
F#
-
Flutter
-
Fortran
-
GPT/AI/ИИ
-
GameDev
-
Git
-
Go (Golang)
-
HTML
-
Hacking and Security
-
Haskell
-
Java
-
JavaScript (JS)
-
Julia
-
Kotlin
-
Machine Learning (ML)
-
Natural language processing (NLP)
-
PHP
-
Pascal
-
Python
-
R
-
Ruby
-
Rust
-
Scratch
-
Swift
-
UML
-
UX/UI
-
Visual Basic
-
Wolfram
-
XML
-
АСУ
-
Проектирование/System Design
-
Сети/Network
-
Схемотехника/электронные схемы
-
.NET (.NET Core)
-
1C
-
APL
-
AWK
-
Agda
-
Agile/Scrum
-
Alef
-
Assembler
-
Basic
-
Beta Programming Language
-
Big Data/DataScience
-
C
-
C#
-
C++
-
CSS
-
Cobol
-
Crystal
-
D
-
Dart
-
DataBase (SQL)
-
Delphi
-
F#
-
Flutter
-
Fortran
-
GPT/AI/ИИ
-
GameDev
-
Git
-
Go (Golang)
-
HTML
-
Hacking and Security
-
Haskell
-
Java
-
JavaScript (JS)
-
Julia
-
Kotlin
-
Machine Learning (ML)
-
Natural language processing (NLP)
-
PHP
-
Pascal
-
Python
-
R
-
Ruby
-
Rust
-
Scratch
-
Swift
-
UML
-
UX/UI
-
Visual Basic
-
Wolfram
-
XML
-
АСУ
-
Проектирование/System Design
-
Сети/Network
-
Схемотехника/электронные схемы
Меню
Raspberry Pi 5 Essentials: program, build, and master over 60 projects with Python
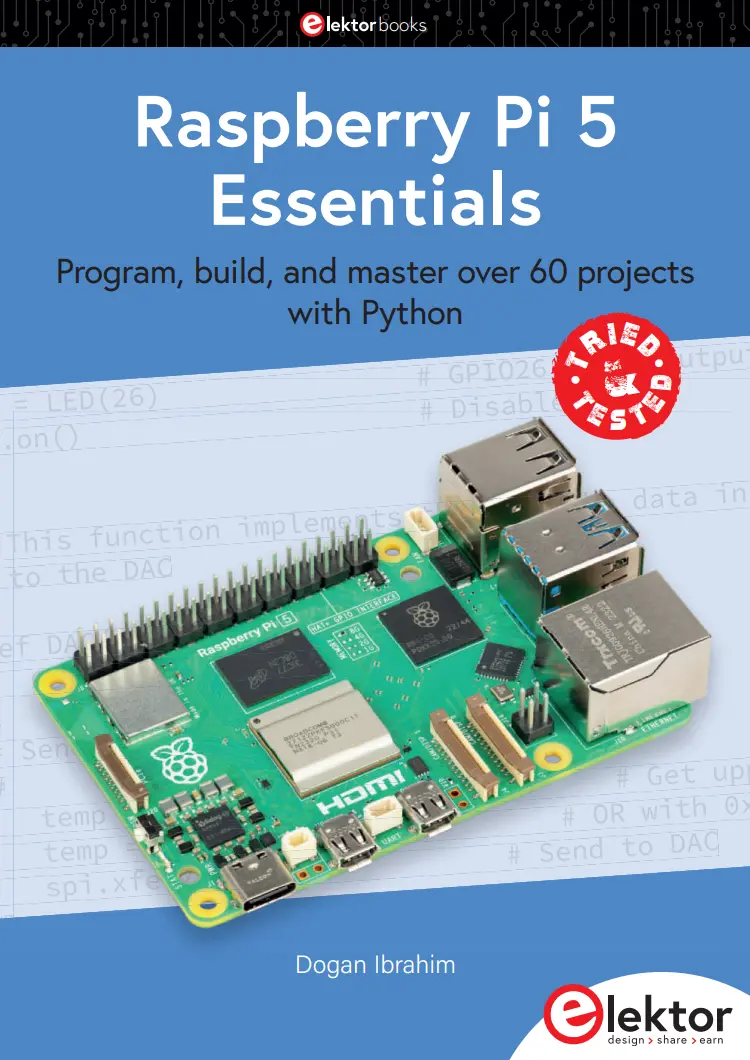
Автор: Ibrahim Dogan
Дата выхода: 2023
Издательство: Elektor International Media B.V
Количество страниц: 324
Размер файла: 11,3 МБ
Тип файла: PDF
Добавил: codelibs
Contents
Preface
Chapter 1 • The Raspberry Pi 5
1.1 Overview
1.2 The Raspberry Pi 5
Chapter 2 • Installing the Raspberry Pi 5 Operating System
2.1 Overview
2.2 Using a pre-installed SD card
2.3 Larger font in Console mode
2.4 Accessing your Raspberry Pi 5 Console from your PC – the Putty program
2.4.1 Configuring Putty
2.5 Accessing the Desktop GUI from your PC
2.6 Assigning a static IP address to your Raspberry Pi 5
2.7 Enabling Bluetooth
2.8 Connecting the Raspberry Pi 5 to a wired network
2.8.1 Unable to connect to a wired network
2.9 Installing the Raspberry Pi 5 Bookworm operating system on a blank microSD card
Chapter 3 • Using The Console Commands
3.1 Overview
3.2 The Command Prompt
3.3 Useful Console commands
3.3.1 System and user information
3.3.2 The Raspberry Pi 5 directory structure
3.3.3 Resource monitoring on the Raspberry Pi 5
3.3.4 Shutting Down
3.3.5 Networking
3.3.6 System information and other useful commands
Chapter 4 • Desktop GUI – Desktop Applications
4.1 Overview
4.2 Desktop GUI Applications
4.2.1 Applications Menu
4.2.2 Web browser
4.2.3 File manager
4.2.4 Terminal
4.2.5 Manage Bluetooth devices
4.2.6 Wi-Fi
4.2.7 Volume control
4.2.8 Date and time
Chapter 5 • Using a Text Editor in Console Mode
5.1 nano text editor
5.2 vi text editor
Chapter 6 • Creating and Running a Python Program
6.1 Overview
6.2 Method 1 – Interactively from command prompt in console mode
6.3 Method 2 – Create a Python file in console mode
6.4 Method 3 – Create a Python file in Desktop GUI mode
6.5 Which method?
Chapter 7 • Python Programming and Simple Programs
7.1 Overview
7.2 Variable names
7.3 Reserved words
7.4 Comments
7.5 Line continuation
7.6 Blank lines
7.7 More than one statement on a line
7.8 Indentation
7.9 Python data types
7.10 Numbers
7.11 Strings
7.11.1 String functions
7.11.2 Escape sequences
7.12 Print statement
7.13 List variables
7.13.1 List functions
7.14 Tuple variables
7.15 Dictionary variables
7.15.1 Dictionary functions
7.16 Keyboard input
7.17 Comparison operators
7.18 Logical operators
7.19 Assignment operators
7.20 Control of flow
7.20.1 if, if…else, and elif
7.20.2 for statement
7.20.3 while statement
7.20.4 continue statement
7.20.5 break statement
7.20.6 pass statement
7.21 Example 1 – 4-Band resistor colour code identifier
7.22 Example 2 – Series or parallel resistors
7.23 Example 3 – Resistive potential divider
7.24 Trigonometric functions
7.25 User-defined functions
7.26 Examples
7.27 Recursive functions
7.28 Exceptions
7.29 try/final exceptions
7.30 Date and time
7.31 Creating your own modules
Chapter 8 • Raspberry Pi 5 LED Projects
8.1 Overview
8.2 Raspberry Pi 5 GPIO pin definitions
8.3 Project 1 – Flashing an LED
8.4 Project 2 – Alternately flashing LEDs
8.5 Project 3 – Binary counting with 8 LEDs
8.6 Project 4 – Christmas lights (random flashing 8 LEDs)
8.7 Project 5 – Chasing LEDs
8.8 Project 6 – Rotating LEDs with push-button switch
8.9 Project 7 – Morse Code exerciser with LED or buzzer
8.10 Project 8 – Electronic dice
Chapter 9 • Using an I²C LCD
9.1 Overview
9.2 The I²C Bus
9.3 I²C pins of Raspberry Pi 5
9.4 Project 1 – Using an I²C LCD – Seconds counter
9.5 Project 2 – Using an I²C LCD – Display time
9.6 Project 3 – Using an I²C LCD – Display IP address of Raspberry Pi 5
9.7 Project 4 – Voltmeter – Output to the screen
9.8 Project 5 – Voltmeter – Output to LCD
9.9 Project 6 – Analog temperature sensor thermometer – output to the screen
9.10 Project 7 – Analog temperature sensor thermometer – output on LCD
9.11 Project 8 – Reaction timer – output to screen
9.12 Project 9 – Reaction timer – output to LCD
9.13 Project 10 – Automatic dusk lights
9.14 Project 11 – Ultrasonic distance measurement
9.15 Project 12 – Car parking sensors
9.16 Project 13 – Fading LED
9.17 Project 14 – Melody maker
Chapter 10 • Plotting Graphs with Python and Raspberry Pi 5
10.1 Overview
10.2 The Matplotlib graph plotting library
10.3 Project 1 – RC transient circuit analysis - Charging
10.4 Project 2 – RC transient circuit analysis - Discharging
10.5 Transient RL circuits
10.6 Project 3 – RCL transient circuit analysis
10.7 Project 4 – Temperature, pressure and humidity measurement – Display on the screen
10.8 Project 5 – Temperature, pressure and humidity measurement – Plotting the data
Chapter 11 • Waveform Generation – Using the Digital-to-Analog Converter (DAC)
11.1 Overview
11.2 The MCP4921 DAC
11.3 Project 1 – Generating a square wave signal with any peak voltage up to +3.3 V
11.4 Project 2 – Generating a sawtooth wave signal
11.5 Project 3 – Generating a triangle wave signal
11.6 Project 4 – Generating an arbitrary wave signal
11.7 Project 5 – Generating a sine wave signal
Chapter 12 • Using the Sense HAT
12.1 Overview
12.2 The Sense HAT interface
12.3 Programming the Sense HAT
12.4 Project 1 – Displaying text on Sense HAT
12.5 Project 2 – Test your math skills – multiplication
12.6 Project 3 – Learning the times tables
12.7 Project 4 – Display the temperature, humidity, and pressure
12.8 Project 5 – ON-OFF temperature controller
12.9 Project 6 – Generate two dice numbers
12.10 Project 7 – Display the current time
12.11 Project 8 – Displaying two-digit integer numbers
12.12 Project 9 – Up counter
12.13 The inertial measurement sensor
12.13.1 Project 10 - Reading the acceleration
12.13.2 Project 11 – Accelerometer-based dice
12.13.3 Project 12 – Accelerometer-based LED shapes
Chapter 13 • Using a 4×4 Keypad
13.1 Overview
13.2 Project 1 – Using a 4×4 keypad
Chapter 14 • Communication over Wi-Fi
14.1 Overview
14.2 UDP and TCP
14.2.1 UDP communication
14.2.2 TCP communication
14.3 Project 1 – Sending a text message to a smartphone using TCP/IP
14.4 Project 2 – Two-way communication with the smartphone using TCP/IP
14.5 Project 3 – Communicating with a PC using TCP/IP
14.6 Project 4 – Controlling an LED connected to Raspberry Pi 5 from a smartphone using TCP/IP
14.7 Project 5 – Sending a text message to a smartphone using UDP
14.8 Project 6 – Controlling an LED connected to Raspberry Pi 5 from a smartphone using UDP
14.9 Communicating with the Raspberry Pi Pico W over Wi-Fi
14.9.1 Project 7 – Raspberry Pi 5 and Raspberry Pi Pico W communication – controlling a relay over Wi-Fi
14.10 Project 8 – Storing ambient temperature and atmospheric pressure data on the Cloud
Chapter 15 • Communication over Bluetooth
15.1 Overview
15.2 Project 1 – Exchanging text with a smartphone
15.3 Project 2 – Bluetooth control of LED from a smartphone
15.4 Arduino UNO – Raspberry Pi 5 Bluetooth communication
15.4.1 Project 3 - Communicating with an Arduino UNO over Bluetooth
15.4.2 Project 4 – Play audio (e.g. music) on Bluetooth speaker via Raspberry Pi 5
Chapter 16 • Raspberry Pi 5 Camera Projects
16.1 Overview
16.2 Installing the Camera
16.3 Project 1 – Still camera commands
16.3.1 libcamera
16.4 Project 2 – Building a time-lapse camera – Who is in my parking place?
16.5 Project 3 – Video camera commands
16.6 Project 4 – Who is ringing my doorbell?
Index
The Raspberry Pi 5 is the latest single-board computer from the Raspberry Pi Foundation. It can be used in many applications, such as in audio and video media centers, as a desktop computer, in industrial controllers, robotics, and in many domestic and commercial applications. In addition to the well-established features found in other Raspberry Pi computers, the Raspberry Pi 5 offers Wi-Fi and Bluetooth (classic and BLE), which makes it a perfect match for IoT as well as in remote and Internet-based control and monitoring applications. It is now possible to develop many real-time projects such as audio digital signal processing, real-time digital filtering, real-time digital control and monitoring, and many other real-time operations using this tiny powerhouse.
The book starts with an introduction to the Raspberry Pi 5 computer and covers the important topics of accessing the computer locally and remotely. Use of the console language commands as well as accessing and using the desktop GUI are described with working examples. The remaining parts of the book cover many Raspberry Pi 5-based hardware projects using components and devices such as
- LEDs and buzzers
- LCDs
- Ultrasonic sensors
- Temperature and atmospheric pressure sensors
- The Sense HAT
- Camera modules
Example projects are given using Wi-Fi and Bluetooth modules to send and receive data from smartphones and PCs, and sending real-time temperature and atmospheric pressure data to the cloud.
All projects given in the book have been fully tested for correct operation. Only basic programming and electronics experience are required to follow the projects. Brief descriptions, block diagrams, detailed circuit diagrams, and full Python program listings are given for all projects described. Readers can find the program listings on the Elektor website www.elektor.com/20703.
